This page outlines the basic steps which you can take to get up and running with Particle Flocker.
This guide is split into the following steps:
- Open the Particle Flocker Window
- Create a Particle Flocker Node
- Create Some Particles
- Set Particle Defaults
- Connect the Particles to the Particle Flocker Node
- Add a Target
- Run the Simulation
- Rejoice!
1) Open the Particle Flocker Window
The first step in using Particle Flocker is (wait for it…) to open the Particle Flocker Window.
Once Particle Flocker has been installed and Maya is loaded you should see a new menu at the top of Maya called TechToast. The Particle Flocker Window can be opened by selecting the Particle Flocker Window menu item.

2) Create a Particle Flocker Node
With the Particle Flocker Window open, the next step is to create a Particle Flocker Node by pressing the large button near the top of the window.

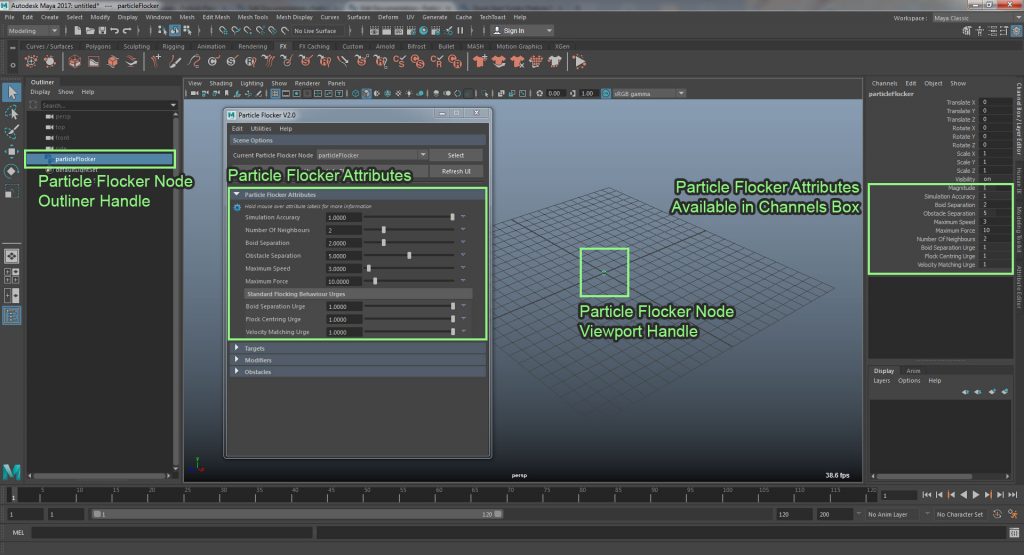
A new Particle Flocker Node will be created in the scene as shown below (click the image to enlarge):
3) Create Some Particles
In order to create a flocking simulation with Particle Flocker, you will need some particles!
Particle Flocker can be used with either nParticles or legacy particles. You can create particles in various ways in Maya and we have listed some of the most common methods below.
Using the Particle Tool
The Particle Tool allows you to hand place particles in the view-port window. Read the Maya help docs for more information on the tool’s modes:
You can access the particle tool by opening the nParticles Menu and choosing the Particle Tool of your choice.

Using an Emitter
Emitters create particles dynamically in the scene when you hit play on the timeline. Read the Maya documentation to find out more about emitters:
You can create an emitter by opening the nParticles menu and choosing the Create Emitter option of your choice.

Using the Create Particles Utility
Particle Flocker has a handy built-in utility for creating groups of particles called the Create Particles Utility. You can access the utility by opening the Utilities menu at the top of the Particle Flocker Window and selecting the Create Particles Utility menu item.

The utility is very simple to use. Simply select the type of particles you want to create, the amount and the bounding range in which to create them and press the Make Particles button.
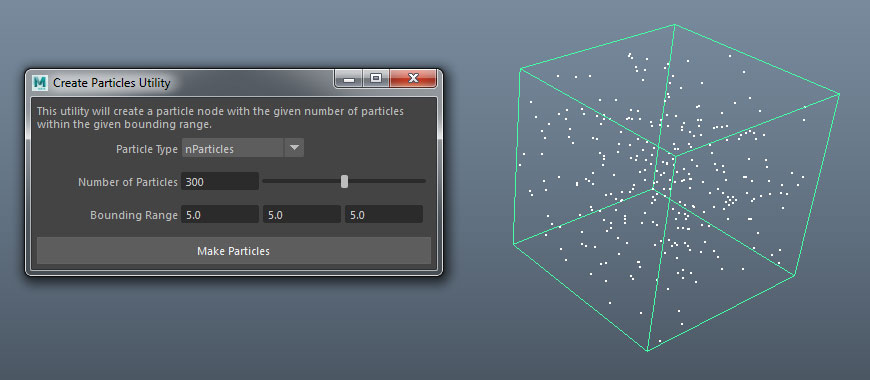
The benefit of using the Create Particles Utility is that it will set up some defaults on the newly created particle node which may otherwise cause issues when you come to simulate. See the Create Particles Utility page for further details.
4) Set Particle Defaults
If you are using Legacy Particles or if you created particles using the Create Particles Utility you can skip this section.
If you are using manually generated nParticles, there are a few default properties which you may want to adjust on the nParticle node which might otherwise cause problems when simulating:
- nParticle Gravity
- nParticle Collisions
If the above properties are left enabled, flocking simulations will still work, but the results may not be as expected.
Disabling nParticle Gravity
nParticles have gravity enabled by default. Using gravity with Particle Flocker can cause simulation issues and it is recommended that you disable it. There are 2 ways to do this; globally on the nucleus solver or on the individual particle node.
You only need to perform one of these steps to disable gravity.
On the Nucleus Solver
Select the nucleus solver and access its Gravity attribute and set it to 0.

On the nParticle Node
Select the nParticle node and access its Ignore Solver Gravity attribute and enable it.

Disabling nParticle Collisions
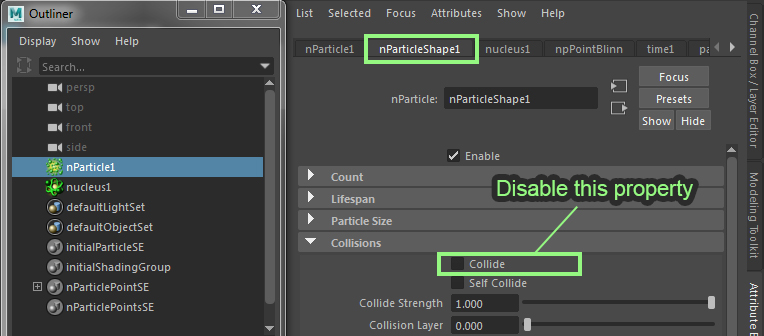
nParticles have collisions enabled by default. This is not strictly a problem when using Particle Flocker, however it is recommended that you disable it unless you actually require this behaviour as it can cause problems depending on the size of the particles being used.
To disable it select the nParticle node and access its Collide attribute and disable it.
5) Connect the Particles to the Particle Flocker Node
Once we have both a Particle Flocker Node and some particles in our scene, the next step is to connect them to one another. Without this connection the simulation will not work.
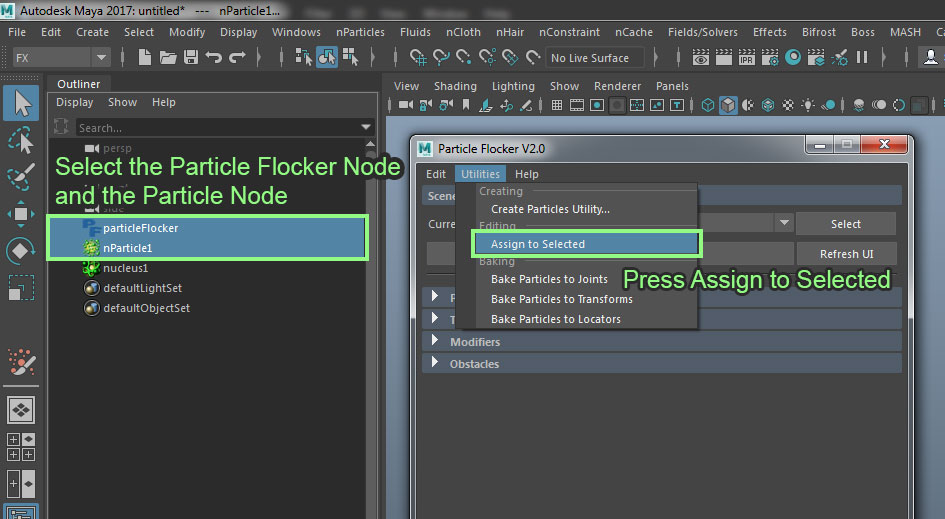
To assign particles to the Particle Flocker Node you need to select both nodes in the scene and open the Fields/Solvers menu and choose Assign to Selected:

Particle Flocker also has a shortcut to this menu item in its Utilities menu which does exactly the same thing. You may find it quicker to use this option rather than having to browse through the Maya menu system:
6) Add a Target
In order to make our particles move as a realistic flock, we need to add a target to the system. You can read more about targets in the Targets section of the documentation.
To create a new target open the Targets roll-out section of the Particle Flocker Window and press the Add New Target button.

A new Target Node will be created in the scene as shown below (click the image to enlarge):
7) Run the simulation
We’re finally ready to start simulating some flocking particles!
Before you get too carried away however, there are a few settings you may want to adjust.
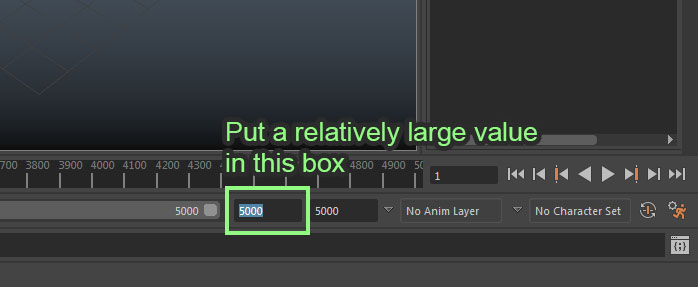
Increase the Time Slider range
Simulations need plenty of available time to run properly and by default Maya’s Time Slider is set to have a relatively short range. You can increase it simply by typing a larger number in the Range End field shown below:
Choose a suitable playback rate
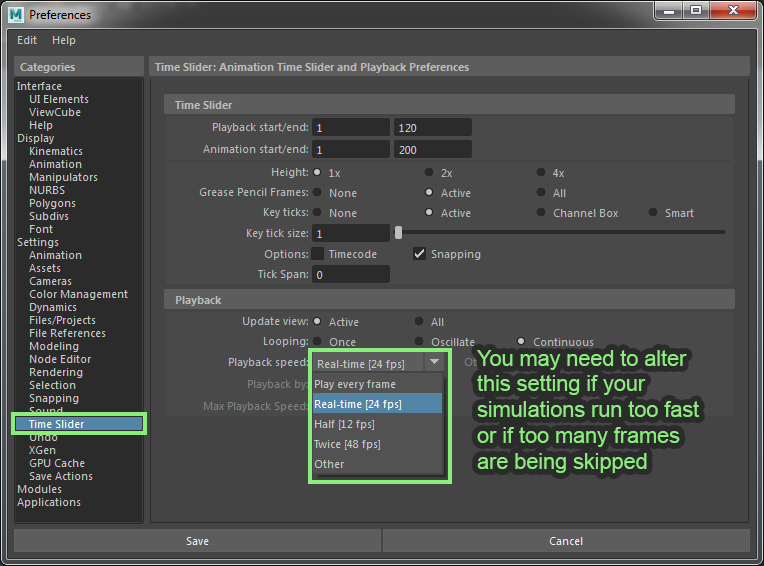
Depending on the complexity of your scene and the performance of your computer you may want to adjust Maya’s playback rate. You can change this in the Maya preferences which can be opened from the Window > Settings/Preferences > Preferences menu item.
For simple simulations with few particles you may find that simulations run far too quickly. If this is the case you should adjust the playback rate to the Real Time setting.
For complex scenes with many hundreds of particles you may find simulations do not work correctly when using Real Time playback. this is because too many frames are being skipped by Maya and the simulation update is not frequent enough. You should use Play Every Frame in this situation.
With all that done you simply need to hit the Play button on the Time Slider to start the simulation!

8) Rejoice!
Congratulations! You have completed the Quick Start Guide.
For further information and tutorials please browse the rest of this documentation or use the search bar at the top of the page to find out about a specific topic.
